
Have you ever wondered how to adjust the belt on your treadmill? Whether you’re a seasoned runner or just starting out, it’s essential to have a properly aligned belt for a safe and effective workout. In this article, we will walk you through the steps of adjusting the belt on your treadmill, ensuring that you can optimize your running experience. So let’s get started and make sure your treadmill is in top-notch condition for your next workout!

This image is property of garagegympro.com.
1. Tools needed for adjusting the belt on a treadmill:
To successfully adjust the belt on a treadmill, you will need a few essential tools. These tools include a screwdriver, an Allen wrench, and treadmill lubricant. The screwdriver is necessary for loosening and tightening bolts, while the Allen wrench is used to adjust the tension of the belt. Treadmill lubricant is essential for ensuring smooth and quiet operation of the belt. With these tools in hand, you’ll be well-equipped to adjust the belt on your treadmill effectively.
2. Understanding the importance of belt adjustment:
Adjusting the belt on your treadmill is crucial for several reasons. By properly adjusting the belt, you ensure smooth and safe operation of the treadmill. An improperly adjusted belt can result in slipping or sliding, which can be dangerous during a workout. Additionally, the correct tension on the belt reduces wear and tear on the motor, helping to prolong its lifespan. Taking the time to adjust the belt on your treadmill is an important maintenance task that can help prevent potential issues down the line.
3. Identifying the signs of an improperly adjusted belt:
Knowing the signs of an improperly adjusted belt is essential for maintaining the functionality of your treadmill. Some common signs to look out for include belt slipping or sliding during use. If the belt feels uneven or loose, it may indicate a need for adjustment. Excessive noise during operation can also be a sign of an improperly adjusted belt. By being aware of these signs, you can quickly identify when it’s time to adjust the belt on your treadmill.
4. Precautions before adjusting the treadmill belt:
Before diving into the process of adjusting the treadmill belt, it’s essential to take a few precautions. First and foremost, ensure that the treadmill is disconnected from the power source. This prevents any accidental starts while working on the belt. It’s also a good idea to check for any loose parts on the treadmill before making adjustments. By taking these precautions, you ensure your safety and the proper functioning of the treadmill.

This image is property of support.horizonfitness.com.
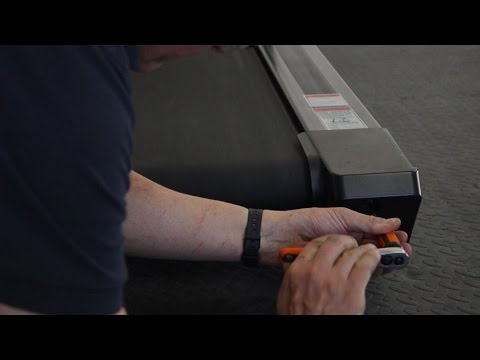
5. Adjusting the tension of the treadmill belt:
To adjust the tension of the treadmill belt, start by locating the bolts at the back of the treadmill. Using a screwdriver, loosen these bolts, allowing the roller to move. Adjust the tension by moving the roller closer to or further away from the belt, depending on the desired tension. Once you’ve achieved the desired tension, tighten the bolts, ensuring they are secure. Finally, check the belt’s tension by attempting to lift it at the center; there should be a slight give, but it should not feel loose.
6. Centering the treadmill belt:
A properly centered treadmill belt is vital for a smooth and even workout. To center the belt, start by loosening the rear roller bolts using an Allen wrench. Once the bolts are loose, you can use the adjustment bolts located on the sides of the treadmill to align the belt. Make small adjustments to each side, gradually centering the belt. Once the belt is centered, re-tighten the rear roller bolts and ensure they are secure.

This image is property of i.ytimg.com.
7. Correcting belt misalignment on a treadmill:
If you notice any visible misalignment of the belt on your treadmill, you can correct it by making a few adjustments. Start by checking for any misalignment, such as the belt veering to one side. To correct this, loosen the front roller bolts using an Allen wrench. Gently realign the belt, making sure it is centered and straight. Once aligned, tighten the front roller bolts, ensuring they are secure. This process helps correct any misalignment issues and ensures the smooth operation of the treadmill belt.
8. Lubricating the treadmill belt:
Regular lubrication of the treadmill belt is essential to maintain its longevity and performance. To lubricate the belt, begin by unplugging the treadmill and lifting the edges of the belt. Apply treadmill lubricant between the belt and the deck, focusing on the center portion of the belt. Use a cloth or your hands to spread the lubricant evenly across the belt. Once you have applied the lubricant, adjust the belt’s tension if necessary and lower it back into place. Lubricating the treadmill belt every few months ensures its proper functioning and reduces friction during use.

This image is property of i.ytimg.com.
9. Testing the treadmill after adjusting the belt:
After you have adjusted the treadmill belt, it’s important to test it to ensure everything is in proper working order. Start by plugging in the treadmill and turning it on. Take a moment to observe the movement and tension of the belt as it runs. If you notice any issues such as slipping, sliding, or excessive noise, address them promptly. Walk on the treadmill to further test the belt’s movement and tension. By thoroughly testing the treadmill after adjusting the belt, you can ensure its optimal performance during your workouts.
10. Regular maintenance tips for treadmill belts:
Regular maintenance of treadmill belts is key to prolonging their lifespan and ensuring smooth operation. Here are a few tips to keep in mind:
-
Cleaning the belt and deck regularly: Use a soft cloth or brush to remove any dust, dirt, or debris from the belt and deck. Regular cleaning prevents the buildup of grime, which can affect the belt’s performance.
-
Checking belt tension and alignment monthly: Take a moment each month to check the tension and alignment of the treadmill belt. Look for any signs of slippage, uneven tension, or misalignment. If adjustments are needed, address them promptly to prevent further issues.
-
Lubricating the belt every few months: As mentioned earlier, regular lubrication is essential for optimal treadmill performance. Follow the lubrication process outlined previously and make it a habit to lubricate the belt every few months.
By incorporating these regular maintenance tips into your routine, you can ensure that your treadmill belt remains in top shape and provides a safe and smooth workout experience.
In conclusion, adjusting the belt on a treadmill is an important task to maintain its functionality and prevent potential issues such as slipping, uneven tension, and excessive noise. By following the outlined steps and using the necessary tools, you can easily adjust the tension, center the belt, correct misalignment, lubricate the belt, and test the treadmill for optimal performance. Regular maintenance, including cleaning the belt and deck, checking tension and alignment, and lubricating the belt, further ensures the longevity of your treadmill belt. With these tips, you’ll be able to enjoy safe and effective workouts on your treadmill for years to come.
This image is property of support.sunnyhealthfitness.com.


