
So, you’ve got a Nordictrack treadmill that needs some TLC? No worries, we’ve got you covered! In this article, we’ll guide you through the process of taking apart your Nordictrack treadmill, step by step. Whether you’re a seasoned DIY enthusiast or just a curious soul looking for some maintenance tips, we’ve got all the information you need to get started. So grab your tools and let’s dive into the world of treadmill disassembly!
How to Take Apart a Nordictrack Treadmill
If you’re looking to disassemble your Nordictrack treadmill, whether it’s for maintenance, repair, or transportation purposes, it’s important to approach the process with caution and follow the necessary steps. In this comprehensive guide, we will walk you through the step-by-step process of taking apart your Nordictrack treadmill, ensuring that you have the necessary tools, understand the disassembly process, and take safety precautions along the way.

This image is property of i.ytimg.com.
Preparing for Disassembly
Before you begin disassembling your Nordictrack treadmill, it’s essential to gather the necessary tools to ensure a smooth and efficient process. The tools you’ll typically require include a screwdriver, an adjustable wrench, pliers, and potentially an Allen wrench, depending on your specific Nordictrack model.
Once you have the tools ready, make sure to turn off the treadmill and unplug the power cord from the outlet. This step is crucial to prevent any accidental power surges or injuries while disassembling the treadmill. It’s also recommended to remove any accessories or attachments, such as cup holders or tablet holders, from the treadmill to make the disassembly process more manageable. Additionally, clearing the area around the treadmill will provide you with ample space to work.
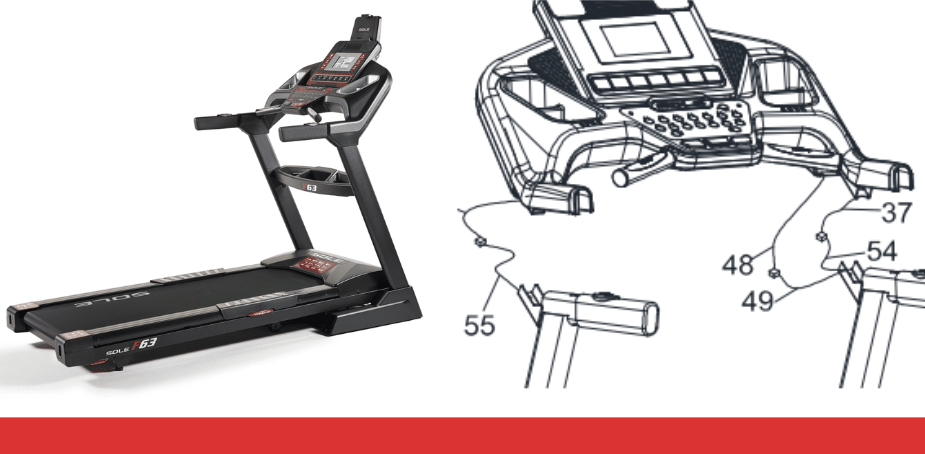
Dismantling the Console
The console is one of the first components to disassemble when taking apart a Nordictrack treadmill. Start by removing the safety key, which typically resides on or near the console. Once the safety key is removed, locate and remove the front cover. This cover may be attached with screws or clips, so use your screwdriver or appropriate tool to detach it carefully.
After removing the front cover, you’ll need to disconnect the console wires. These wires are typically connected to the console with connectors or clips. Gently detach the wires by either squeezing the clips or sliding the connectors out. Once the console wires are disconnected, you can detach the console from the treadmill. The console may be connected with screws, so make sure to remove them using the appropriate tool.
Removing the Handlebars
The handlebars are another component that needs to be removed from your Nordictrack treadmill. To start, identify the handlebars, which are typically located towards the front of the treadmill. Depending on your specific model, the handlebars may be secured with bolts or screws. Use the appropriate tool to unscrew and remove these fasteners.
Once the bolts or screws are removed, you may find that the handlebars are connected to wires or cables. Carefully disconnect these wires or cables by either squeezing the clips or sliding the connectors apart. Once the wires or cables are disconnected, you can proceed to lift and remove the handlebars from the treadmill.
Taking Apart the Motor and Belt
Now that you have disassembled the console and handlebars, it’s time to focus on the motor and belt. Begin by locating the motor cover, which is typically positioned near the rear of the treadmill. Remove the motor cover by carefully unscrewing or unclipping it.
Once the motor cover is removed, you’ll need to disconnect the motor wires and cables. Similar to the console wires, you can detach them by squeezing the clips or sliding the connectors apart. With the motor wires and cables disconnected, you can now release the tension of the belt. Refer to your treadmill’s user manual for specific instructions on how to release the belt tension.
Next, remove the bolts or screws that hold the motor in place. These fasteners generally secure the motor to the treadmill base. Carefully lift and detach the motor from the treadmill base, ensuring you have a steady grip and avoid any unnecessary strain. Once the motor is detached, you can proceed to remove the treadmill belt by sliding it off the rollers.

This image is property of runbryanrun.com.
Disassembling the Treadmill Base
The treadmill base is a crucial part of the disassembly process. To start, securely lock the treadmill base to prevent any unwanted movement or accidents. Next, identify and remove any screws or bolts that are securing the base to the frame of the treadmill. These fasteners may be located at various points along the base, so ensure thorough inspection.
After removing the screws or bolts, carefully detach the base from the frame of the treadmill. This step may require some strength, so take your time and consider seeking assistance if needed. Once the base is detached, you can then proceed to disassemble any remaining parts that are connected to it, such as motor mounts or cooling fans.
Taking Apart the Frame
The frame of the Nordictrack treadmill is the final component to disassemble. Begin by identifying and removing the screws or bolts that are holding the frame together. These fasteners may be located at various points throughout the frame, so ensure thorough inspection.
Once you have removed the screws or bolts, detach any remaining parts that are connected to the frame, such as side panels or support bars. This step may require some maneuvering and strength, so approach it carefully. Lastly, carefully separate the frame into individual pieces, ensuring that each piece is easily manageable and can be safely transported or stored.

This image is property of runbryanrun.com.
Transporting and Storing the Disassembled Parts
Now that you have successfully disassembled your Nordictrack treadmill, it’s essential to prioritize the transportation and storage of the disassembled parts. Securely pack and label each part to ensure organized and easy reassembly later on. Use proper packaging materials, such as bubble wrap or foam, to protect the parts from any potential damage during transportation.
When storing the parts, make sure to choose a dry and safe location. Avoid areas with excessive moisture or temperature fluctuations, as these can potentially damage the parts. If possible, store the parts in a well-organized manner, grouping them logically to facilitate an efficient reassembly process.
Reassembling the Nordictrack Treadmill
After safely transporting and storing the disassembled parts, it’s time to put your Nordictrack treadmill back together. Refer to the manufacturer’s assembly instructions, which typically provide detailed step-by-step guidance on reassembling the treadmill.
Begin with the frame and reassemble the individual pieces according to the instructions. Connect any remaining parts to the frame, such as side panels or support bars, ensuring that they are securely attached. Reattach the treadmill base to the frame, aligning the screw holes or bolts with their corresponding locations.
Next, install the motor and belt by carefully sliding the belt onto the rollers and securing the motor back in place. Connect the handlebars and console by reversing the disassembly steps, ensuring that any wires or cables are securely connected. Finally, securely tighten all screws and bolts, checking for any loose fittings.
Once everything is reassembled, plug in the power cord and turn on the treadmill. Test the functionality of the reassembled treadmill by adjusting the speed settings, incline levels, and monitor the console for any errors or malfunctions. If everything operates smoothly, congratulations on successfully reassembling your Nordictrack treadmill!

This image is property of i.ytimg.com.
Safety Precautions
Throughout the disassembly and reassembly process, it’s crucial to prioritize safety. Always follow safety guidelines provided by the manufacturer, as they are specifically designed to ensure your well-being. Use caution when handling heavy or sharp objects, wearing appropriate protective gear such as gloves or safety glasses.
Ensure the treadmill is completely turned off and unplugged before starting the disassembly process. This step mitigates the risk of electrical shocks or accidental power surges. By taking these safety precautions, you can greatly reduce the potential for injuries or damages during the disassembly and reassembly of your Nordictrack treadmill.
Seeking Professional Help
If you are unsure or uncomfortable with disassembling your Nordictrack treadmill, it is always a viable option to consider hiring a professional. Professional technicians have the expertise and specialized tools to safely disassemble and reassemble the treadmill, ensuring a hassle-free experience for you.
While there may be associated costs with hiring a professional, it provides peace of mind, knowing that the disassembly and reassembly process is handled by someone with the necessary knowledge and experience. Consider this option, especially if you lack the time, resources, or confidence to carry out the disassembly yourself.
Taking apart a Nordictrack treadmill requires careful planning, attention to detail, and adherence to safety precautions. By following the step-by-step instructions provided in this comprehensive guide, you can confidently disassemble and transport your Nordictrack treadmill for maintenance, repair, or relocation purposes. Remember to take your time, stay organized, and approach each step with caution to ensure a successful and stress-free disassembly process.

This image is property of i.ytimg.com.
